Installing a standalone FTP server on a Windows Server 2019 to transfer files
Setup:
- no IIS preinstalled
- Only have Administrator account
Initialising FTP
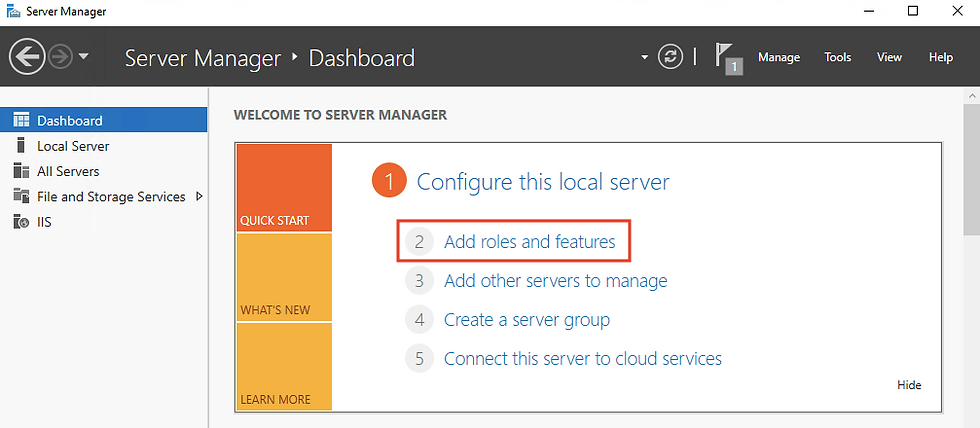
In Server Manager > Dashboard select: "Add roles and features"

In Add Roles and Features Wizard:
Before you being > “Next” Installation Type > “Role-Based or feature-based installation” Server Selection > “Select a server from the server pool”
Server Roles > “Web Server (IIS)”
Features > “Next”
Web Server Roles (IIS) > "Next"
Role Services > “FTP server” + “FTP service”
Confirmation > “Next”
Create a self sign cert
In Internet Information Service (IIS) Manager under Windows Administrative Tools, click on the server name and select: "Server Certificates"

In Server Certificates page:
1. Select > "Create Self-Signed Certificate"
2. Give a friendly name for the certificate
3. Select "Personal"
Adding a FTP site
In Internet Information Service (IIS) Manager under Windows Administrative Tools, right click on the server name and select: "Add FTP Site"

In Add FTP Site Wizard:
1. Name the FTP site
2. Link it to a folder of your choice
3. In IP Address > select the server's IP address
4. Port > 21
5. SSL > assign it to the self sign cert created previously

6. Under Authentication > select "Basic"
7. Authorization > select "Not Selected" as it will be done in the next step

Allocating access to the FTP site
In Internet Information Service (IIS) Manager under Windows Administrative Tools, click on your FTP site based on the name you provided previously and select: "FTP Authorization Rules"

In FTP Authorization Rules page: (this setup is highly customisable based on your needs)
1. Select > "Add Allow Rule"
2. I selected "Add specified users" (I have created a user group for ftp access together with granting bob access to the ftp for experimental purposes)
3. Gave permissions of > "Read" + "Write"

Access the FTP service
In your browser, enter: ftp://<server_ip>
Enter the credentials when the prompt appears
*This FTP service can only be accessed internally, where your machine is in the same network as the FTP server.
FTP command in to writing a file:
1. Navigate to the file's path/destination
2. Enter command: ftp <server_ip>
3. Enter the credentials
4. Enter command: put <file_name>

Making the FTP service publicly accessible
It would be better to take not make this publicly accessible when not needed as FTP can be a vulnerable service. Someone who really hates you might be doing a brute force on your FTP service..?
To do so:
1. Get a domain
2. Connect the domain to the FTP service
3. Make your FTP service publicly accessible through the domain
The domain provider depends on personal preference. I used No-ip free domain service which expires every 30 days.

Domain in image used for this blog's setup was: justforfun.onthewifi.com
In Internet Information Service (IIS) Manager under Windows Administrative Tools, right click on your FTP site based on the name you provided previously and select: "Edit Bindings..."

In Site Bindings Wizard:
1. Select "Add"
2. Select type as "ftp"
3. Enter the FTP service IP address follow by selecting port 21
4. Enter the Host Name that you have from your domain provider. In my case, it was justforfun.onthewifi.com

Made the FTP publicly accessible by enabling port forwarding on my router. (The setup will vary according to your router) Turn it off when not in used.

Once done, the FTP service is now accessible through your allocated domain and in my case it was: ftp://justforfun.onthewifi.com
There are many ways to access the FTP service:
- It's internal IP address (when your machine is in the same network as the FTP service)
- It's NAT address (with port forwarding enabled / ON)
- Allocated domain name (with port forwarding enabled / ON)
END
Kommentare